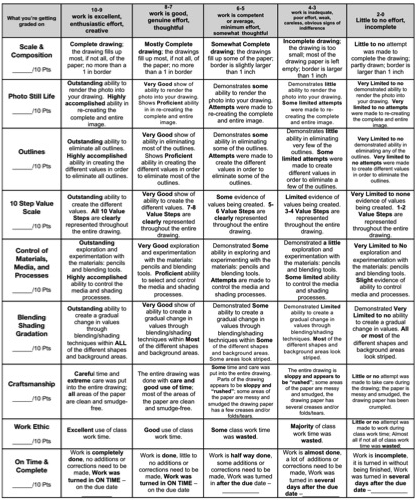
Photo Still Life
| photo_still_life_drawing_procedures___rubric.pdf |
PHOTO STILL LIFE DRAWINGS DUE:
A DAYS: WEDNESDAY, SEPTEMBER 23rd
B DAYS: FRIDAY, SEPTEMBER 25th
Lesson/Project Objective: My job for this project is to apply what I’ve learned about creating values to eliminate outlines in my Photo Still Life Drawing. By the end of this project, I will have created all 10 values from the value scale and eliminate all outlines to render 3-dimensional objects in a realistic Still Life Tonal Drawing.
Materials/Tools: #2 Pencils
9 X 12 White Drawing Paper
Ruler Blending tool Still Life Picture
Value Scale/Sphere handout
Vocabulary:
Still Life – a grouping of inanimate objects to be drawn, painted and/or photographed
Perspective – creates the illusion of depth and volume on a 2-D surface; created by overlapping, size variations, placement, detail, color, & converging lines (foreground, middle ground, & background)
Proportion – the principle of design concerned with the size relationships of one part to another
Imitationalism – An aesthetic theory of art that places emphasis on the literal qualities. According to this theory, the most important thing about a work of art is the realistic representation of subject matter. A work is considered successful if it looks like and reminds the audience of what is seen in the real world.
Realism – Mid-19th-Century artistic style in which familiar scenes are present as they actually appeared
Procedures: (Check off procedures as you complete them)
___________ Step 1: Frame It – if you want
Draw a rectangular frame on your paper – NO MORE than 1 (ONE) inch on all sides.
___________Step 2: Softly/Lightly
Draw on your paper the ENTIRE photo still life as you SEE it – use correct perspective and proportion – DRAW WHAT YOU SEE!!!
___________Step 3: Values
Add ALL the values you see within the photo still life onto your still life
___________Step 4: Blend, Blend, Blend
Use a blending tool or change the direction of your pencil strokes to eliminate scribbles
___________Step 5: Eliminate Outlines
Make sure your values eliminate all remaining outlines in your drawing
___________Step 6: Background
Make sure the background values are included in your work
___________Step 7: Name!!!!
Make sure your NAME and period is on the back of your work WRITTEN in PENCIL!!
Write your name on the Grade Rubric as well!!
___________Step 8: Assessment/ Reflection
Grade your project; be as accurate as you can. Add up your points earned out of 90. Complete the reflection with good, complete, and thoughtful answers!!! Use your art vocabulary!!!
___________Step 9: Turn In!
Turn in your project with the completed grading rubric and completed reflection
Helpful Hints, Warnings, and Insights:
*You may GRID your picture and drawing paper if you’d like
*If you do grid your paper, make sure the grid lines are LIGHT!!!!
You will need PERSERVERANCE, PERSISTENCE, AND PATIENCE
SLOW DOWN!!!
AVOID washed out values!!! CREATE ALL 10 VALUE STEPS from the value scale
DRAW WHAT YOU SEE!!! Do not add anything to the image that isn’t already there and do not omit anything that is
Remember to create the image’s background in your drawing – draw it the way it is – DRAW WHAT YOU SEE